Category: Letters/ Correspondences /Emails
When sending correspondences by email, or as pdfs attached to an email, or sending for signature, PeopleWerksHR groups the correspondences into a “batch” for processing. The batch and its individual correspondences are tracked so you can easily see the status and manage the batches.
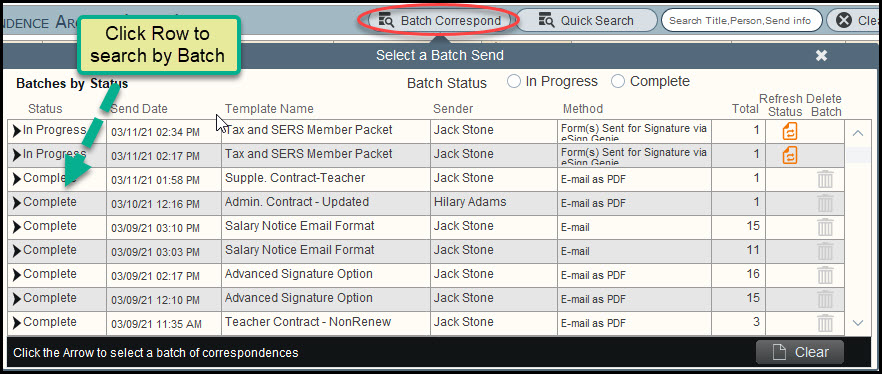
To access the batch, click either on the Reporting section and select Correspondence Archive or if you are in the Letters/Emails section, click on the Correspondence Archive button from the Distribution List screen.
At the top of the screen click the button Batch Correspond and you will see the following.
To manage correspondences you can do the following:
- You can view the status of batches, the sent date, the template or packet name, the sender and method of how sent. Note that batches are sorted descending with the most recent as the first record.
- By clicking on the status for a given batch, you will see all of the correspondences in that batch.
- If you are using the Send for Signature process you can refresh the status of a batch by clicking on the Refresh Status icon.
- For Email or Email as PDF send methods only, you can click on the Delete icon to delete from the archive all of the sent correspondences in that batch.
Previously, you could not have text following a signature block except by placing it in the footer. Now there is new template style that is called “1 column Portrait Adv Sgn” to allow for adding text after the signature block.
The body of the template is divided in two sections – text above the signature block and text below the signature. Click on the Text Below Signature to enter the text needed after the signature block. Click on the Text Above Signature to return to the text preceding the signature block.
You can include a link to another document by entering or copying the “native” link into the letter template. You cannot copy a link that is shown as plain text like “click here”, it must be the actual link.
If you do not want to use the native link, you can create a separate document in Word that has the link with terminology like “click here” and then use the Save-As function to save the document as a PDF. Then in your letter template in PeopleWerksHR, include the PDF as an attachment.
You can share your letter templates with others by clicking on the Edit icon next to the template name. Select the person or people from the list by clicking on the Add icon. You can also share a template with a department.
Expanding on the feature of sending documents via email to employees, PeopleWerksHR can send documents for electronic signatures. Documents can be routed to just one person for signing or routed for multiple signatures based on your workflow requirements. Signed documents are automatically returned and saved in PeopleWerksHR. No longer does the employee have to print out a copy of their document, sign it, and return to the HR office for filing.
Using the same Letters section of PeopleWerksHR and making minor adjustments to existing templates, the distribution list is used to send documents out for employee signatures. The user/sender will receive an email that the batch of documents are being processed and if there are any errors with the email addresses.
Your employees will receive an email with the document attached for their signature. They will click on a web link to see their document and enter the required information. Once they sign and submit the document, they will get an email back with the signed document for their records. At the same time, the system will send the sender an email with the signed document attached and will save it in PeopleWerksHR.
During the process, PeopleWerksHR keeps track of the status of documents sent for signing so you can check the status at any time to know if a document has been viewed or signed.
If you are a user of the electronic signature system or have just subscribed to the electronic signature feature of PeopleWerksHR, check out the documentation by clicking here: PeopleWerksHR_Electronic_Signatures_V2
There are options for including a logo, a letterhead image, and/or a signature block when creating letter templates. Unlike Word, you cannot insert images in your letter templates, so PeopleWerksHR Support will load these into your system for you to select.
For your logo or letterhead image, send PeopleWerksHR Support the graphic image in pdf, jpg, png, or similar format.
For signature blocks, send PeopleWerksHR Support a sample of the signature block to show the formatting and whether it is left or right justified in the document. Send the signer’s signature as a separate image so that it can be used to create the signature block.
You will find the letterhead and signature options in the System Administration Settings section in the Admin/Config menu. The logo image is in the Operational Settings section of General Settings in the Admin/Config menu. 
![]()
Overview
Special notifications can be automatically sent to employees reminding them of upcoming expiration dates for licenses, permits, background checks, and/or trainings. You can generate your own customized notifications and schedule when the notification should be sent out. As an example, you could have the system send a reminder two months before background checks expire, and then again one month before they expire and then one week before they expire. Using this feature, you would no longer need to remember to send out emails manually through the Letters section reminding people of what they need to do because an employment requirement is expiring.
Initial Setup
Turn on the permission for this feature for the person or persons who will be setting these up. 
Notification Creation
Use the Auto Notifications option found in the Letters/Email menu.
To set up a notification, click on New Notification to build your e-mail style template. Enter a Subject Line and the Body of the email. You can copy and paste from another template in Letters or from another source if you want. You can add merge fields, also, just like in the Letters section. Click on Preview Content to review the template to confirm it looks as you expected.
There are four setting that you must configure.
- Enter a Notification Title
- Enter a Description
- Select a Notification Category so the system knows which expiration date to check. The options are as follows:


- Enter the email address for the person who needs to know who received the notifications from the daily job. For example, the daily job runs and finds three people whose background check expiration date meets the criteria. Each of the three people will receive the notification but someone else will receive an email with the list/report of the three people so they know who was notified. This may be you but if you are creating this automated notification and someone else is responsible for managing it, then you would enter their email address instead of your own. You can enter multiple email addresses separated by semicolons if needed. It is important that someone receives this report to know what is being generated out of PeopleWerksHR.
Make sure to click on the Save Notification button. Once it has been saved, you must set up a Notification Schedule to indicate when notifications should be sent. You can have the notification sent multiple times at different time intervals. Notice that you can change the status to Inactive if you do not want a particular schedule to run.
Distribution List
You must select search criteria for the system to know what employee group should get the notifications. Make sure to include employee status in the criteria. Do not add any expiration date in the criteria because the system already knows what expiration date to look for based on the notification setup.
Make sure to click on the Save Search Criteria at the bottom of the screen.
Notification Generation
Once you have the initial setup complete and your notifications created, the system will do the rest. Each day, 365 days a year, the system will look to see what notifications are set up; will search for people who meet the criteria; will check the schedule to see if it is time to send a notification; and will send the emails to the applicable people. It will generate the report to the designated email address entered in the setup area for their information. It will also save the notification in the correspondence history of the employee.
Once you have selected your letter template and created your distribution list, you are ready to generate the letters for distribution to your people. There are several options:
- Print – Use this option to print hardcopies of the letters for delivering to your people. By clicking on the Review and Print button, you will see a document for each person on your Distribution List with their data merged into the template. Using the options at the top of the screen, you can step through each of the documents to review them before printing. When ready to print, click on the Print button. You can also use this option to print the whole group of letters to a single PDF document to use for review before printing.
- Email – Use this option if your template style is Email. By clicking on the Review as Email button, you will see an email for each person on your Distribution List with their data merged into the template. Use the Next button at the bottom to view each of the emails. If you do not want to send one or more of them, you can use the Omit button to remove the email. Note the email address that will be used for each person. When you are ready to send them, click on the Send button.
- PDF – Use this option to send letters as PDFs via email to the people on your Distribution List. When clicking on Review as PDF, you are required to enter a common email that will be sent with the letter attached as a PDF. Note that you can change the sender’s name and email address to someone else in your organization if needed by clicking on * From.
- Electronic Signature – Use this option to send letters for electronic signatures. If you have not subscribed to this feature, you will not see it as an option. When clicking on Send for Signature, you are required to enter a common email that will be sent with the letter attached as a PDF. Note that you can change the sender’s name and email address to someone else in your organization if needed by clicking on * From but they must be an authorized sender of documents for signature. Contact PeopleWerksHR Support to assist in setting up senders.
Changes to Letter Sending As of Version 7.4.5 (March 2021)
- If you are sending your correspondences by plain email, pdf’s via email, or sending for signature, once you click the send button, the system will send your batch of records to the server for processing. In each case you will see a message in the window letting you know that you can continue with other activities while the system processes your correspondences accordingly. Once the system has completed the send process, you, as the sender, will receive an email where the body of the email will be a report noting the success or failure of each correspondence sent via the manner you chose.
- With the exception of printing, once the system has completed one of the other functions, each correspondence will be automatically archived into the individual personnel’s correspondence history.
If you are printing letters as hard copies, there is an option to generate mailing labels for the people on your Distribution List. Click on Print Labels and select labels for mailing to their home or labels for mailing to their home building. You will also be given the option for different label sizes.
First select the letter template from the Template list and make sure there are no changes that are necessary to the template before using it to send out to your people. Click on the Go to Distribution List button on the bottom right corner to set up the list of people who should get the letter.
Distribution List
The distribution list can be generated by manually selecting the names of the people from the Personnel Selection list on the left. You can search by Last Name or just scroll down through the list to find the person’s name. Click on the name of the person to add them to the Distribution List.
The alternative way to generate the Distribution List is to click on the Advanced Search button and enter the search criteria for finding the people who are to get the letters.
Once you have the group of people in the Distribution List, you can manually remove one or more people by clicking on the Remove icon or add to the list by selecting a name from the Personnel Selection List on the left. Note the radio buttons at the top of the list to modify the Distribution List based on only one letter per person or one letter per job.
If you are sending the letters out by a form of email, you will want to visually look for any “envelope” icon that is in red that indicates an email address is missing for a person in the list.