In the full personnel list that is displayed when you select Employees, Substitutes or Volunteers from the Personnel menu, click on the Print Personnel Summary Reports button for options. These reports contain the information shown in the personnel list.
Category: Reports and Worksheets
In the General System Reports section in the Reporting menu is the Job-Next Evaluation report.
You can generate a Leave Summary report from the Leave Summary section in the Personnel menu. Select a group of people using the Quick or Advanced search option or enter an employee’s name in the free search space. Then click on the Print Leave Balance Summary button.
There are also two report in the General System Reports section in the Reporting menu called Employee Leave Requests and Leave Balance Summary.
There are many versions of seniority reports available in the General System Reports section of the Reporting menu. There are employee-based reports, job-based reports, and license-based reports. Many of these reports include a special Seniority Sort button at the top of the page to format the data in special seniority formats.
Various staff directories are available in the E-Directory section of the Reporting menu.
The first step is to use the Directory Search to select the group of people you want in your directory. You can modify the list by adding other people using the Add Employee button or by omitting people using the Omit icon.
There are several types of directories that are available in different sort orders:
- General directory – includes name, position, home or work building, address, phone numbers
- Work phone directory – includes name, work building and work phone
- Photo directory – includes name, photo, position, work building, work phone, email address
- Birthday directory – includes name, work building and date
You can also generate labels for home or work addresses.
Directories are based on work building so it is important that people are in the right work building, not just the right home building.
In the Salary Schedule Admin section of the Fiscal menu, there are two types of salary schedule reports.
Click on the Print Salary Schedules button to review the rates in salary schedules. There are multiple options for viewing current year, next year, or comparison or current and next year.
Click on the Print Salary Reports button for salary schedule reports that show details or summaries of personnel on the individual schedules.
There are special reports that provide an overview of an individual person’s information.
In the Employees, Substitutes and Volunteers sections in the Personnel menu, you can generate individual personnel reports for a group of people. Use the Advanced Search or Quick Search to select the group of people and click on the Batch Individual Summaries button to see the options.

In the Personnel Details section, select an individual and click on the Report Options button to see the options.
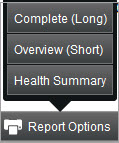
This Report Options button is also available in the Employee Editor.
On the Home page is a section for dashboard charts and graphs.
There are many types of charts. Click on the green dots below the section to navigate to the different charts.
These charts are based on the list of active personnel that shows on the right side of the page and will change based on any quick search criteria that you have entered.
There are two types of reports found in the System Integration Assignments section in the Admin/Config menu that show who has what integration assignments and who does not have the integration assignment set.
Use the Quick Search or Advanced Search to find the group of people you want to review.
To see all the integration assignments for the selected people, click on the Integration Summary button and the report will show you the assignments by system.
If you want to see if everyone has an integration assignment for a particular system, select the system from the System dropdown list at the top right and click the Exception Report button.
To see all the sent correspondences that have been archived in the employees’ records, select the Sent Correspondence History found in the Reporting menu. This report is only for viewing, not for printing or exporting, and provides a way to easily find when certain documents were sent and their status. By clicking on the envelope icon, you can see the email that was sent with certain documents. By clicking on the information icon, you can see the exact document that was sent.