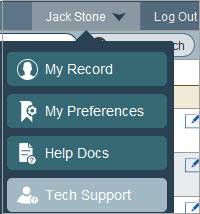
In the top menu bar is information and settings for your account. Click on your name to view the four options.
My Record – shows the data in your own personnel record. If you have system permissions to edit your own data, then you can do so, otherwise, the information is for read only.
My Preferences – provides options for various defaults in addition to allowing you to subscribe to electronic notifications. The “Key for Special Display Fields” is used for displaying the SSN which is encrypted in your system. If this is blank and you are authorized to view the SSN, you will need to ask for the key from an HR user and enter it or contact PeopleWerksHR Support.
Help Docs – takes you to the online help documentation system.
Tech Support – links to Zoom for screen sharing with PeopleWerksHR Support who will provide a meeting passcode.
When a user changes or adds certain data in the system, notifications are automatically generated to people who need to know about them. This is a very useful communication feature of PeopleWerksHR. These notifications are shown on the system Home page but they can also be sent as emails to people who are not users of PeopleWerksHR.
There are over thirty different notifications covering additions or changes in the following types of information:
Name
Contact Information (address, email address, phone #, etc.)
Emergency Contact
Employment Status
Job Assignment
Job Salary
Job Contract
Demographics
Education Hours
Background Check Dates
Leave Requests
The list of notifications on the Home page can serve as an action item list. You can view the notification and when you do not need it any more, just delete it. You can also select one or more notifications to print or export.
To subscribe to additional notifications, click on the My Preferencessection in the My Account menu.
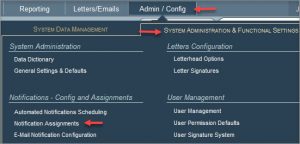
To subscribe others to get notifications, click on the Notification Assignments section in the Admin/Config menu. Click here for more information.
Special notifications can be automatically sent to employees reminding them of upcoming expiration dates for licenses, permits, background checks, and/or trainings. You can generate your own customized notifications and schedule when the notification should be sent out. As an example, you could have the system send a reminder two months before background checks expire, and then again one month before they expire and then one week before they expire. Using this feature, you would no longer need to remember to send out emails manually through the Letters section reminding people of what they need to do because an employment requirement is expiring.
Initial Setup
Turn on the permission for this feature for the person or persons who will be setting these up.
Notification Creation
Use the Auto Notifications option found in the Letters/Email menu.
To set up a notification, click on New Notification to build your e-mail style template. Enter a Subject Line and the Body of the email. You can copy and paste from another template in Letters or from another source if you want. You can add merge fields, also, just like in the Letters section. Click on Preview Content to review the template to confirm it looks as you expected.
There are four setting that you must configure.
Enter a Notification Title
Enter a Description
Select a Notification Category so the system knows which expiration date to check. The options are as follows:
Enter the email address for the person who needs to know who received the notifications from the daily job. For example, the daily job runs and finds three people whose background check expiration date meets the criteria. Each of the three people will receive the notification but someone else will receive an email with the list/report of the three people so they know who was notified. This may be you but if you are creating this automated notification and someone else is responsible for managing it, then you would enter their email address instead of your own. You can enter multiple email addresses separated by semicolons if needed. It is important that someone receives this report to know what is being generated out of PeopleWerksHR.
Make sure to click on the Save Notification button. Once it has been saved, you must set up a Notification Schedule to indicate when notifications should be sent. You can have the notification sent multiple times at different time intervals. Notice that you can change the status to Inactive if you do not want a particular schedule to run.
Distribution List
You must select search criteria for the system to know what employee group should get the notifications. Make sure to include employee status in the criteria. Do not add any expiration date in the criteria because the system already knows what expiration date to look for based on the notification setup.
Make sure to click on the Save Search Criteria at the bottom of the screen.
Notification Generation
Once you have the initial setup complete and your notifications created, the system will do the rest. Each day, 365 days a year, the system will look to see what notifications are set up; will search for people who meet the criteria; will check the schedule to see if it is time to send a notification; and will send the emails to the applicable people. It will generate the report to the designated email address entered in the setup area for their information. It will also save the notification in the correspondence history of the employee.
A very useful communication feature of PeopleWerksHR is its electronic notification system. When a user changes or adds certain data in the system, notifications are automatically generated to people who need to know about them. These people do not need to be users of PeopleWerksHR, the notifications can be sent to them as emails.
There are over thirty different notifications covering additions or changes in the following types of information:
Name
Contact Information (address, email address, phone #, etc.)
Emergency Contact
Employment Status
Job Assignment
Job Salary
Job Contract
Demographics
Education Hours
Background Check Dates
Leave Requests
To manage who gets what notifications, click on the System Integration Assignments section found under Notifications in the Admin/Config area.
Click on the Subscribe Employeebutton at the bottom right of the screen and select the employee from the list. In the Manage System Notifications screen, you will see the available notifications in the lower half and you can just click on the Add icon to “subscribe” to the notification.
If someone only wants notifications applicable for certain groups of people, click on the Edit icon next to the Current Notification and select the buildings or classifications that apply.
If you want to send notifications to a person who is not in PeopleWerksHR, you can click on the Subscribe External button and enter their name, email address and then select the notification type.
You can manage your own notifications from the My Preferences section found by clicking on your name at the top right of the screen.
In addition to notifications being sent out by email, they show on the Home Page as well in the System Notifications section. This can be used by PeopleWerksHR users like an action item list. Employee notifications can be viewed, printed, exported or deleted.